About LensPass
LensPass helps you deliver immersive experiences:

- Keep devices fully updated with your VR content and settings
- Simple syncing with on-demand or scheduled group screenings
- Customize screenings with your own branding and messaging
- Engagement analytics and real-time device performance alerts
LensPass is a better way to share VR with an audience.
With no technical expertise needed, you can use LensPass to implement smooth and successful VR screenings using a variety of formats and customization options.
Setup your devices with the LensPass Android app.
What phones and VR headsets are supported by LensPass?
LensPass currently works with all Gear VR headsets (Samsung Galaxy device required).
LensPass is also supported on Oculus Go headsets.
Support for Daydream phones and headsets will be available soon.
What if I don't already own VR devices?
Purchase or rent convenient WeLens VR Kits. Each VR kit comes prepared with LensPass for your screening.
What kind of VR content does LensPass support?
LensPass currently supports 360° video content in MP4 and MKV formats. It currently does not support non-video VR content.
What if I don't have my own content?
If you don't already have content to share, LensPass can help you select content from a variety of categories, including "Most Popular", "Entertainment", "Travel", "Art" and "Marketing".
The Browse Tab of the LensPass mobile app also lets you browse video experiences.
Contact WeLens Support for assistance with preparing content once you have made your selections. Some content may require additional licensing from the creator or publisher.
How much does LensPass cost?
See the LensPass Pricing for more information on pricing options and the LensPass free trial option.
Once subscribed to LensPass, you can disable membership renewal at any time from your account settings.
Getting Started
LensPass is an integrated solution consisting of an online dashboard, an Android app, and a VR player app.
This section will walk you through how to use each one of these products.
Create your account
You can register for a new account at WeLens.com, or from the LensPass app.
Online Account Dashboard
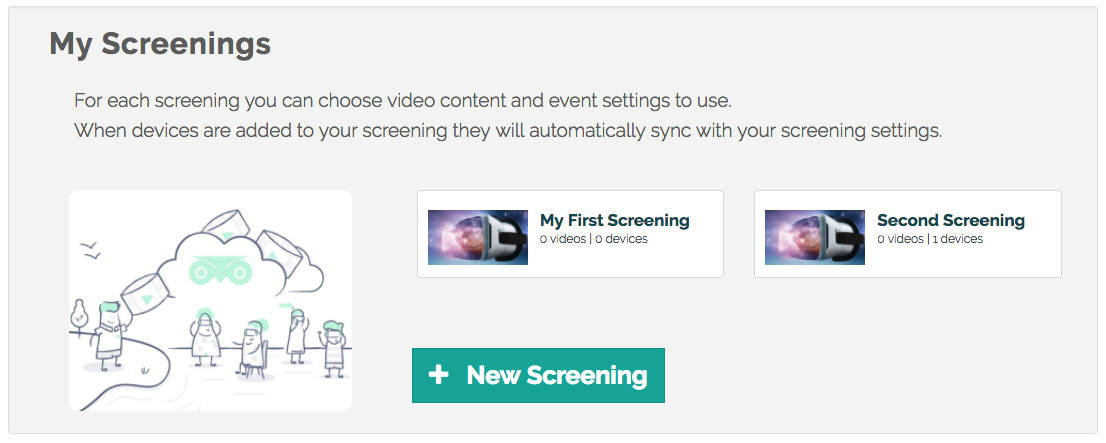
Once you are logged into the WeLens.com website, you can do a number of things from the online account dashboard:
- Upload your video files or find published videos to use for your screenings.
- Create and edit your screening settings and assign devices to screenings.
- View the latest status of your devices.
- Setup orders to purchase or rent WeLens VR kits
Tap the Add Screening button to create a new screening.
When setting up or adding a screening, you will choose a screening name and select one or more videos to use for your screening. You can also select a screening configuration and add optional customizations.
Using the Lenspass App for Android
The LensPass app for Android lets you manage and update each of your devices and control screenings.
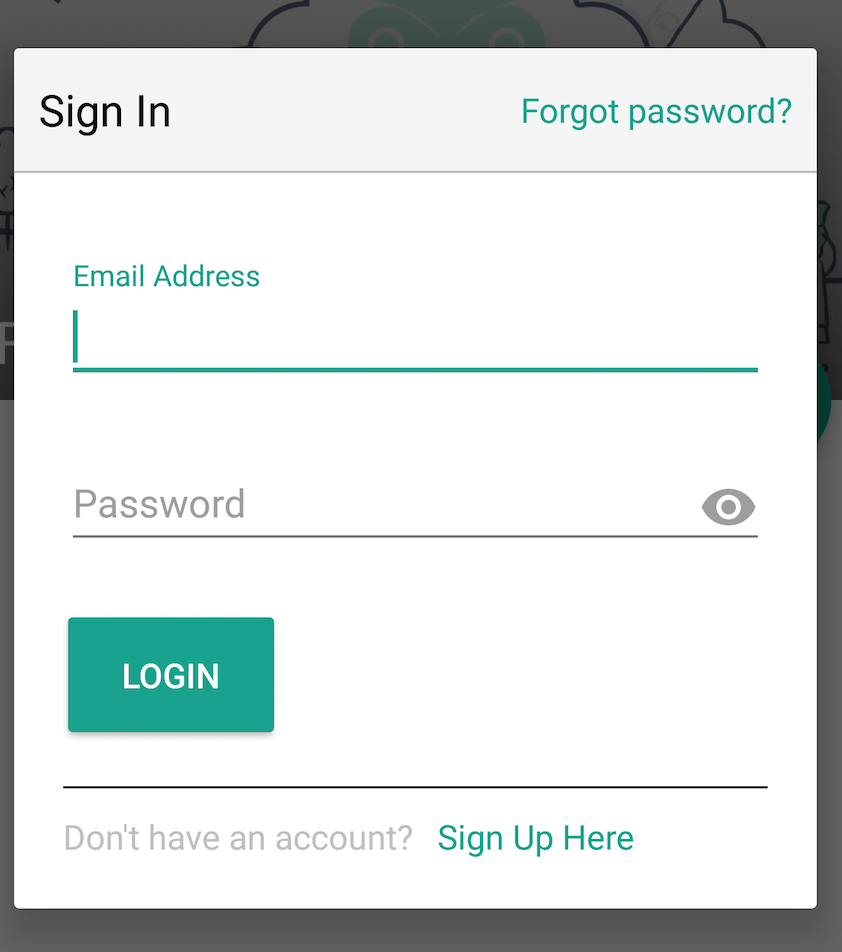
Start by logging into an account from the LensPass app. You can tap the Get Started button or the Account shortcut in the navigation menu to show the Sign In dialog. This dialog also has an option to Sign Up for a new account.
Once you are logged in, your device will be connected to your account and will appear on the online account dashboard. A short ID is assigned to the device and is generated from a longer hardware device ID.
The screening syncing feature is convenient and automated. When your device is assigned to an screening, videos and screening settings will automatically download to your device.
There are several other useful features offered by the LensPass Android app:
- Browse online videos and watch videos that you have downloaded to your device.
- Administer on-demand screenings to other devices over a wireless network.
- Sync your latest device health and performance metrics to your account's online dashboard
Using the LensPlayer App
LensPlayer is the VR player app that integrates with LensPass to show VR experiences with customized settings
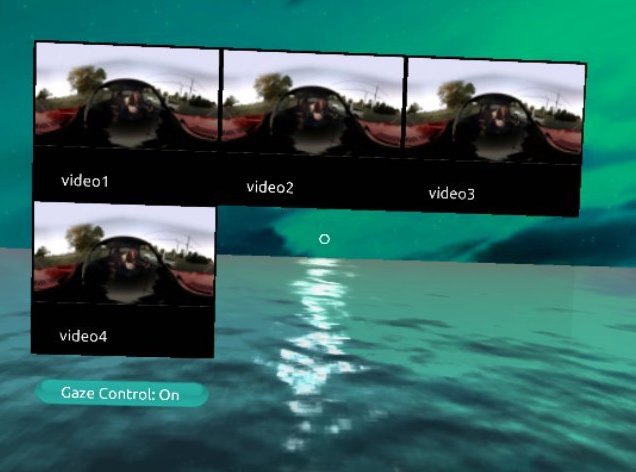
When your device is not assigned to an screening, launching LensPlayer from an application menu shortcut will open it into Menu Navigation Mode that offers various navigation options and opens to a menu of videos that have been downloaded or sideloaded into your device's welens folder.
Once a selected video is playing, there are a variety of navigation controls available when you tap your touchpad:
- Pause and unpause the video, and navigate to the previous or next video in your playlist.
- Hover the cursor over the progress bar and tap your touchpad to skip forward or back in the video
- Hover the cursor over the "eye" icon under the progress bar and tap the touchpad to reset your view position.
- Double-tap the touchpad to skip ahead to the next video
- Back button to return to the video selection menu
When assigned to an screening, LensPlayer opens in a theater mode where normal controls and navigation features are disabled and viewers are in a cinema waiting area before their screening begins.
Screening options and advanced configuration options can be setup to customize LensPlayer for your screening.
The LensPlayer app does not require the LensPass Android app, and without a screening configuration provided, it will automatically import videos from the following directories:
- Movies
- My Videos
- Oculus/Movies
- Oculus/360Videos
- DCIM
- welens
Setting up Your Screening
Screening Overview
You can configure your screenings with VR video experiences and your choice of options.
- Create a new screening and upload video or select an uploaded or shared video to use for your screening.
- Log into your account with the LensPass Android app, and your devices will get your screening configuration.
- Open LensPlayer to view your VR content, or remote control viewings from the LensPass app.
Remote Control
Any device with the LensPass Android App can be used to remote control viewings on other devices. The remote control device and playback devices should be connected to the same WiFi network.
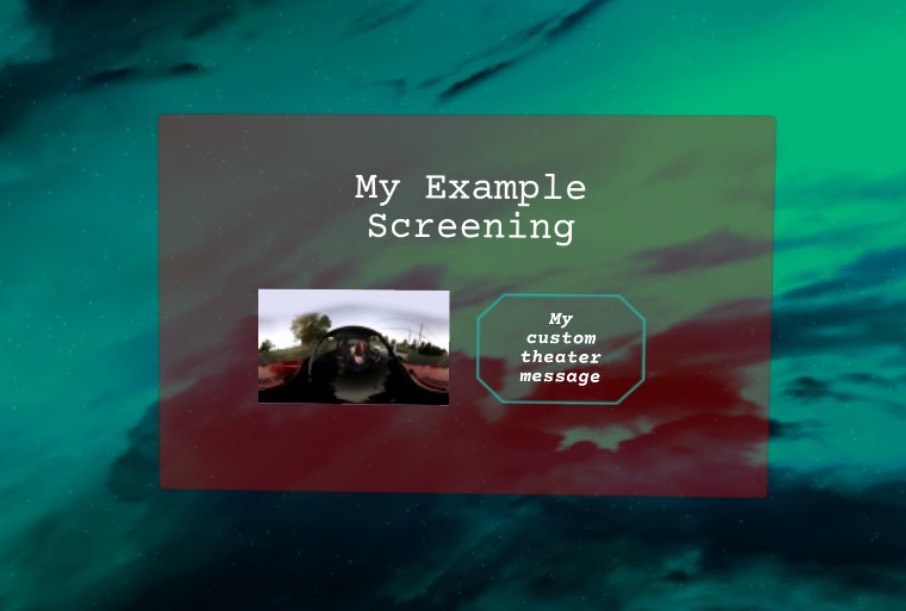
Preparing headsets for a remote control screening: Once the video experiences have finished downloading on a device, launch LensPlayer and it will show a Theater Mode waiting area screen:
Starting a remote control screening: From the LensPass app on your control device, select the Remote Control tab from the navigation menu. This tab shows a list of any other devices found on the same wireless network. When devices are available, there is both a large play button that broadcasts a play command to all available devices, and small play buttons for each device that only broadcast commands to that device. You must hold down your finger for a couple seconds on the play button to activate it - this press and hold gesture avoids accidentally starting playback.
Once a video has started playing on a device, you should see its title along with for how long the video has been playing. During playback, you can use a large stop button or smaller stop button to respectively stop playback on all devices or just one device. As with the play button, a two second press and hold is required.
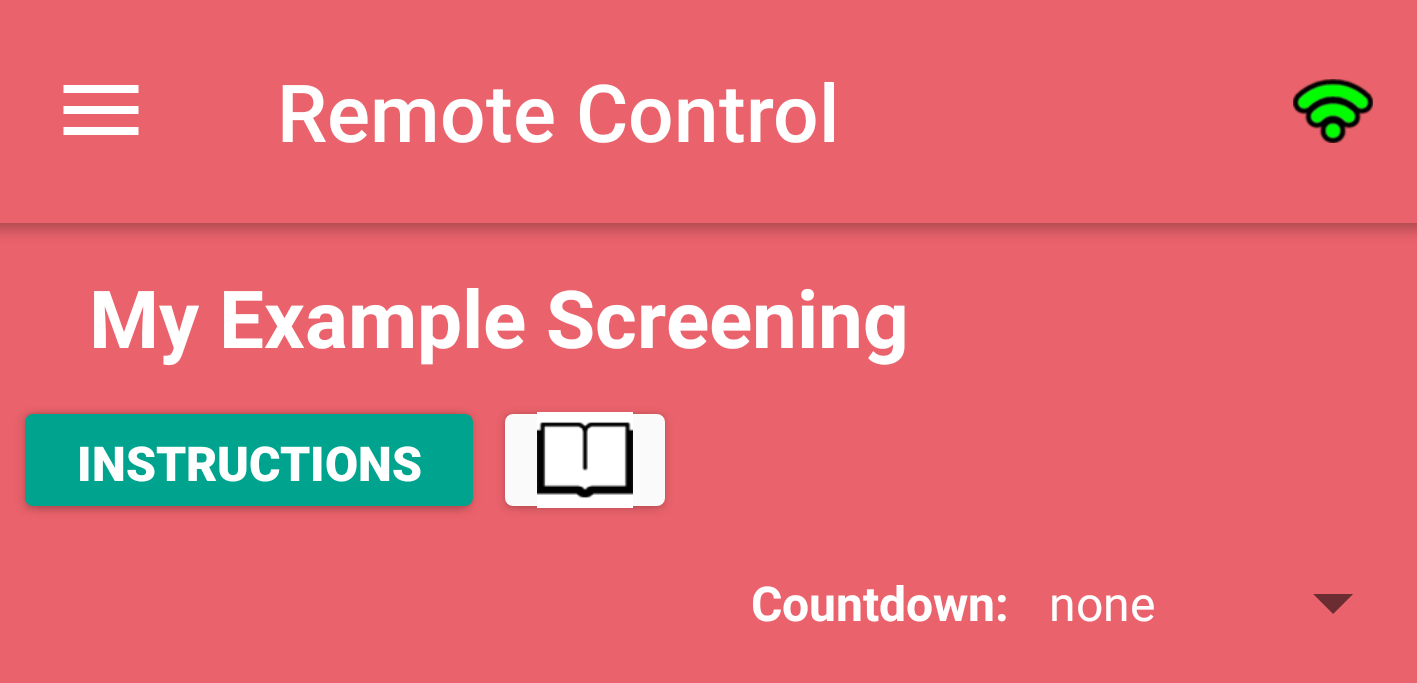
To optionally target a specific video to be played back from a selection of multiple videos, tap the small book icon to the right of the Instructions button as shown in the above screenshot. You will then be able to select a video to play, and can scroll with your finger to scroll through the list of available videos. Make sure that the playback devices already have any selected video file on their filesystem.
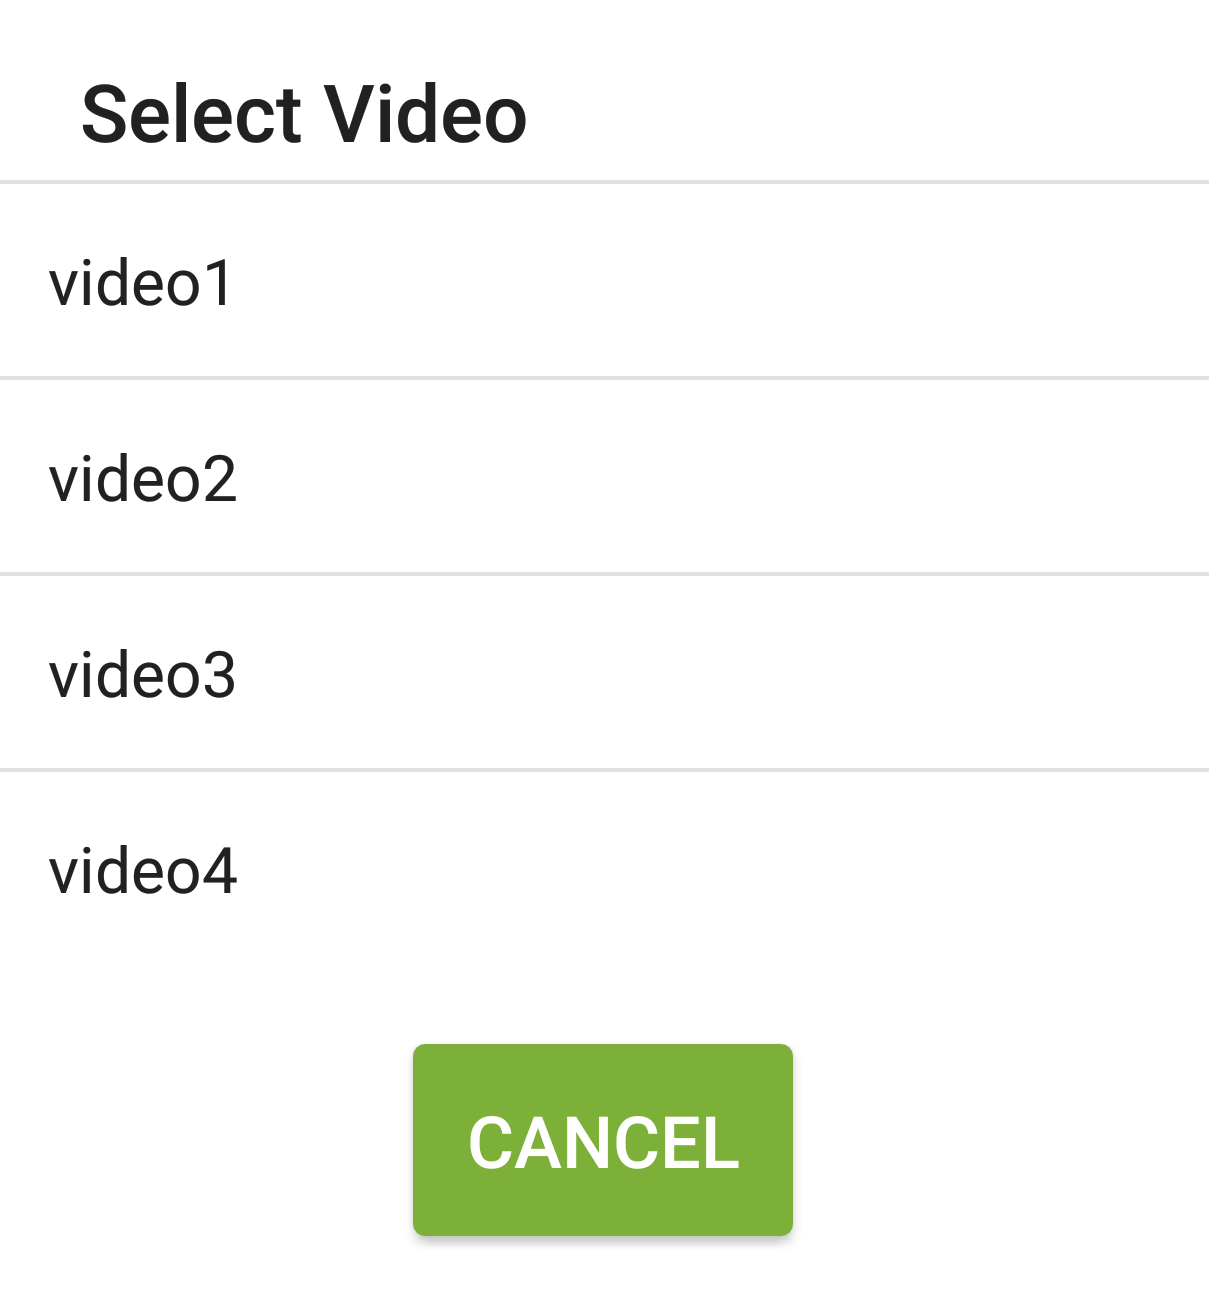
Once you have selected a video, it will be displayed next to the book icon. To remove your selection, tap the book icon again and select the No Selection option at the top of the selection dialog.
You can also optionally specify a countdown of seconds for the screening that will display in the Theater Mode lobby before the screening begins.
Device Health Warnings: When a device has lower than 10% battery or has a temperature of greater than 37 degrees celsius, a will be shown over its device icon on the remote control view.
Any type of wireless network can be used for a remote control group screening. Internet access is not required. All devices must be connected to the same network - even a tiny travel router such as the GL-MT300N works.
Choose a Screening Style
The table below offers a convenient comparison between the three main screening styles to choose from.
"Synced screening" options are used to make all devices start playback at the same time.
| Screening Style | Description | |
|---|---|---|
| 1 | Quick Start | The easiest non-synced screening option. When the viewer puts on the headset, the VR experience will automatically begin with an optional countdown. |
| 2 | Remote Control | Connect all playback devices to a wireless network and use one device as a remote control for your screening. |
| 3 | Menu Navigation Mode | Touchpad and back button controls are enabled and the VR player opens to a menu screen for selecting a VR experience. |
Options & Customizing
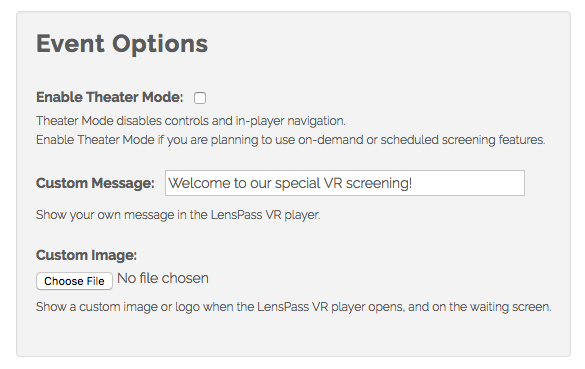
You can setup a custom image to appear in LensPlayer, by uploading an image at the Edit Screening page on the online dashboard. You can also customize the thumbnail images shown for each video by uploading images on the Edit Video page for each video.
You can also setup a custom message from your WeLens.com screening settings. This message will show to viewers before your video experience begins.
If you have a custom message set, the custom image or video thumbnail will render in a small size of 625x375px. If there is no custom message, the image will render in a medium of 1250x750px. You can check the Extra Large Image option that instead of showing a theater title or custom message, will only render a large image in 2000x1200px resolution.
Manual "Start Screening" Command
In some situations, you may not be able to successfully implement a remote control screening, or you don't want to wait for the specified scheduled screening time.
Double tap the small elevated "back button" on the right side of an idle headset to manually start playback.
Stats & Reporting
Playback Stats Overview
LensPass automatically collects some basic reporting statistics that help you to determine audience engagement with your screenings.
Stats are available from the "Screening Stats" link on the WeLens.com dashboard page for each screening. If no statistics have been collected yet, some example stats are shown.
Statistics include a daily breakdown of content that was viewed and it can be filtered by device or by day.
The number of incomplete viewings - or viewings that were ended before the content was finished - is also included. Viewing sessions that last under 20 seconds are not counted as viewings.
Syncing & Troubleshooting
Not seeing the latest stats? Statistics can be collected while offline, but you must connect your device to the internet and open the LensPass Android app to send the latest offline statistics to the WeLens server for this data to be included in reports.
Troubleshooting
Troubleshooting Tips
This section contains tips for common troubleshooting issues.
- When having trouble opening the LensPlayer app in the headset - Make sure to tap the LensPlayer shortcut on the device's homescreen and you'll be prompted to connect the device to the Gear VR headset. The phone screen should be facing the lenses of the VR headset and the micro USB connector on the headset should be placed into the micro USB port on the bottom of the device. Refer to the following diagram:
If you do not hear a sound confirming the connection and see a black screen and the WeLens logo when you look through the Gear VR headset, try disconnecting and launching the LensPlayer app again. If you restart the device and are still unable to get it connected to the VR headset, there may be a hardware problem with either the phone's USB port or the Gear VR headset's USB connector.

- When you find yourself in Oculus Home, or an area that looks like somebody's home with menu options - Disconnect the device from the headset and relaunch the LensPlayer app from the homescreen shortcut.
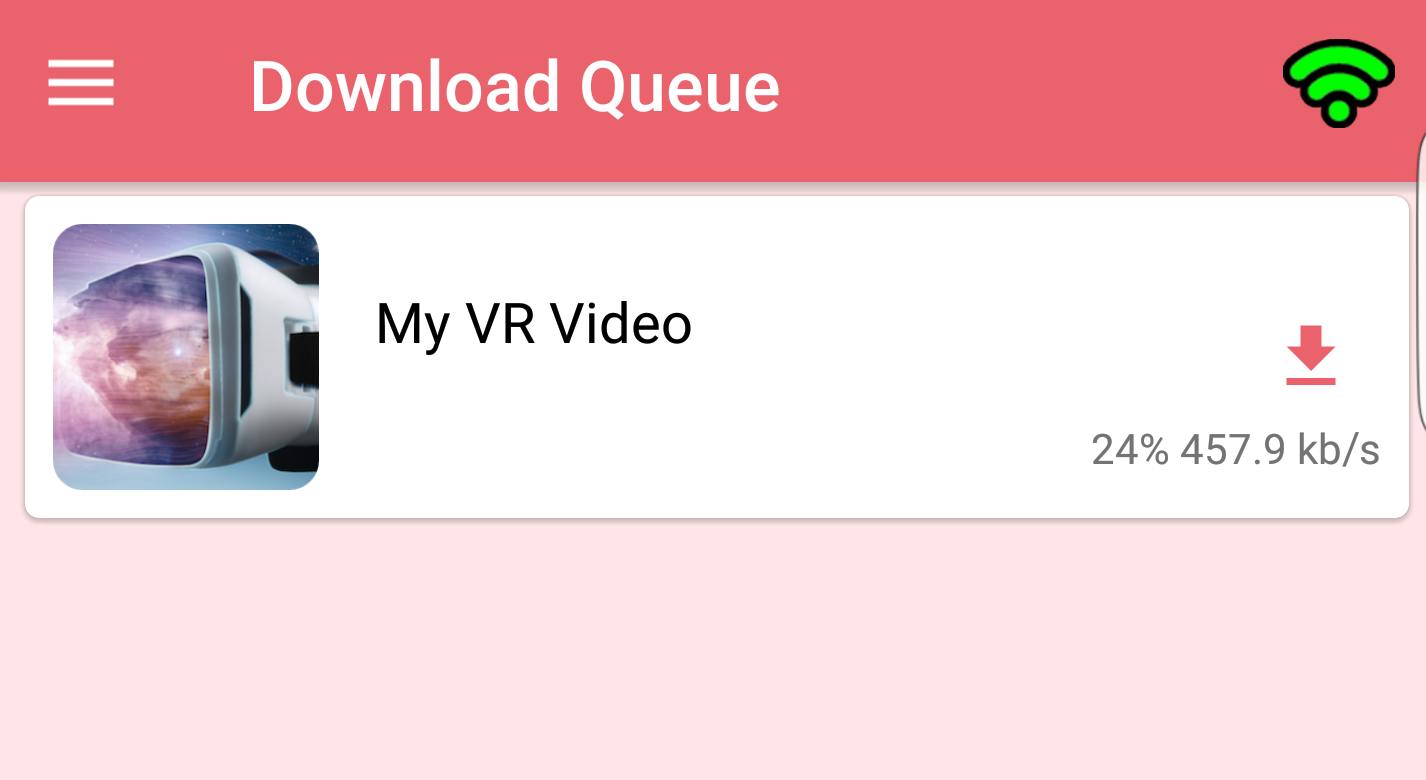
- When you get error messages such as "video not found" in the LensPlayer app - make sure you have fully downloaded video content from the LensPass app (leave the app open until the Downloads tab does not show any current downloads and the completed download appears in the Watch tab with your video library). If you are sideloading instead of downloading, make sure you have sideloaded the video to the welens folder on your device.
- When getting overheating warnings - The device should never feel more than slightly warm to the touch, and a hot device will produce performance problems and overheating warnings. Remove the device from the headset and charge it to help expedite the cooling process, and it can also help to use a cooler or ice pack to help devices more quickly cool down.
- When prompted for an Oculus login - The Oculus app may sometimes prompt you to login. To do this, you need to be connected to the internet and open the Oculus app, where you can either login or register with an email and password, or login with Facebook.
- Issue not covered here? - We recommend you contact our support for assistance if your troubleshooting issue is not listed here or the instructions to solve it are not working.
Oculus Go Issues
The standalone Oculus Go device works well with our LensPlayer VR app and supports all of its features, including remote control functionality. However, there are a few issues currently affecting the Oculus Go that are not present on Gear VR headsets.
Controller is Required to Start Applications - All apps, not just LensPlayer, require the paired handheld controller to be used to start them. There is currently no workaround for this. A controller can only be paired to one headset at a time, and when using multiple headsets it is helpful to label controllers for the headsets to which they are paired.
"Enter VR" Lock Screen - After the headset is not worn for 30 seconds, an "Enter VR" screen will appear.

Normally, the handheld controller is required to exit this screen. Using the mobile Oculus app, it is possible to enable "Developer Mode" so that the volume button on top of the Oculus Go can instead be used to exit the "Enter VR" screen, as shown in the screenshot above. There is currently no way to entirely disable this feature.
Sideloading Content - The LensPass Android app is not supported on Oculus Go, and the only way to currently sideload content and settings for LensPlayer is to connect the Oculus Go to a computer with a USB cable. Once USB Storage is available, the LensPlayer app will support conveniently importing content and settings using a MicroUSB OTG Drive.
Sending Device Diagnostics
When contacting support, we recommend using a built-in LensPass diagnostic feature that helps us better support you.
First, make sure your device is connected to the internet. To send device diagnostics, navigate the LensPass app to the "Device" tab, and tap the "Send Device Diagnostic" button. You'll see a notification confirming that the diagnostics have been sent successfully.
